OUR
Bookkeeping Tips
Each month, we share our top bookkeeping tips to help you make the most of your accountancy software’s many, many functionalities.
Whether you’re using Sage, Quickbooks, Xero or FreeAgent you’ll find handy tricks and tips below…


2024
- Find the invoice number and open the invoice in QuickBooks.
- Click the attachment icon bar in the bottom left-hand corner of the invoice.
- Scroll through your documents and select the document you want to attach.
- Click Save.
Sending quotations is a vitally important part of your business, the customer will make the purchase decision based on your quoted price.Xero’s quote feature is “priceless”, it will inform the potential customer bout the prices of your products/services.You can use the follow-up feature on your original email to chase a response from the customer.Once your quotation is accepted, you can proceed through Xero with the invoice generation and the actual sale.
Chasing payments can be an uncomfortable task but ultimately it is a very important aspect of business.
QuickBooks has a ‘default’ reminder message, so when you see overdue invoices just hit the ‘Remind’ button and off goes the email to your clients, reminding them to pay what they owe.
- Click on the Settings tab and go to the General Settings option.
- Open the ‘Users’ link and press the ‘Add a User’ button.
- The next screen is all up to your discretion. Roles range from ‘None’, which grants no permission, to ‘Advisor’, which allows full access to the accounting data. Supplemental data access can also be considered, and you can easily cobble together the data access scheme that best fits your business needs.
- Click on the Advanced option in the Accounting menu.
- Click on the Financial Settings option and select the Lock Dates feature.
- Enter the date you wish to lock transactions and click the save button.
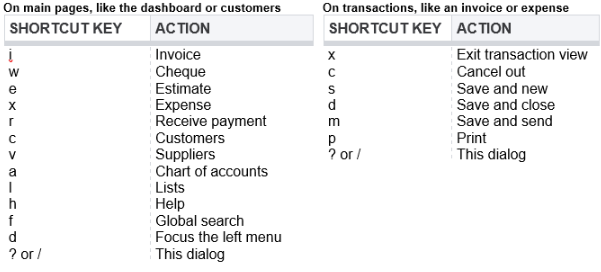
In order to use the following shortcuts, two keys are constant: CTRL and ALT. You need to press these keys and the corresponding shortcut keys to access the shortcut (ex. CTRL+ALT+A, CTRL+ALT+C, etc.).
Shortcuts for Regular Pages | Add New | Shortcuts for Transaction Pages | Add New |
A | Chart of Accounts | C | Cancel out |
C | Customers | D | Save and close |
E | Estimate | M | Save and send |
F | Search Transaction | P | Print |
H | Help | S | Save and new |
I | Invoice | X | Exit transaction view |
L | List | ||
R | Receive payment | ||
V | Supplier | ||
W | Check | ||
X | Expense | ||
?or/ | This dialog | ||
Save time on data inputting on Xero by using the following keyboard shortcuts regarding dates.
Shortcut | Shortcut Keys |
Today’s date | Tab t |
Tomorrow’s date | tom |
Day in the next week | next [day] |
Next week (7 days from today) | next w |
Next month (today’s date, next month) | next m |
Next year (today’s date, next year) | next y |
Any month after today’s date (today’s date for that month) | next [month] |
Bypass entering individual transactions manually by automating the process, set up recurring transactions.
These may include bills, rent payments, income, and purchase orders from suppliers. This will save you time and will serve as a reminder for upcoming transactions.
Follow these 8 easy steps:
Step 1: Select the Gear icon at the top right of the screen.
Step 2: Under Lists, select Recurring Transactions.
Step 3: Click New.
Step 4: Select the type of transaction to create and select OK.
Step 5: Enter a template name.
Step 6: Choose a type, such as scheduled, unscheduled, or reminder.
Step 7: Enter the necessary information.
Step 8: Save the template.
- Open the Accounting Menu.
- Select the Advanced option.
- Click the Find-and-Recode option.
You can open more than one Tab when using Quickbooks online.
For a quick link, right click on any link in QuickBooks and click open link in new tab.
In any business it’s important you know what’s going on with your hard-earned money.
In QuickBooks you can ensure your accounts always reconcile.
For example, when you receive a statement or a payment remittance, ensure it reconciles with your QuickBooks.
This covers all statements, including those for credit cards, loans and bank accounts.
To help you organise and easily find the reports you prefer and use on a regular basis:
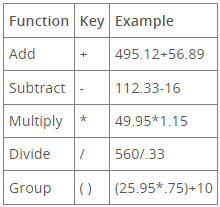
Xero has an inbuilt calculator that allows you to perform basic math functions directly in certain fields. Using this calculator decreases the chance of an entry error.
The inbuilt calculator has addition, subtraction, multiplication, division and group functionality.
To use it, just type in an equation — e.g. 15 * 1.12 — into a field. Press enter or tab and Xero calculates the result.
You can use this calculator for transactions as well as manual journals.
It happens to everyone; you’re in the zone, flying through your bank feed and before you know it, you’ve incorrectly matched a transaction.
Xero’s ‘unreconcile’ feature lets you fix this mistake quickly.
Since unreconcile keeps the account transaction and the bank statement line but removes the connection between them, this Xero tip will save you a ton of time and hassle.
Here is how to unreconcile an account transaction:
- Click on the three little dots to the right of the account name on the Dashboard.
- Go to account transactions under the find header.
- Click the transaction you want to change to open it.
- On the next screen, click options and then select unreconcile.
- Click OK on the pop-up window to unreconcile the transaction.
- After you’ve completed this process, you can now re-reconcile the bank statement line.
I would advise that you should reconcile your bank account on a regular basis, weekly or monthly depending on the number of transactions that are going through your bank. Most importantly before your VAT return is due.
- Click on Accounting on the left hand side
- Click on reconcile
- Choose your account to reconcile
- Add in the date and the balance of your actual bank at the date you have entered
- The difference should be 0.00*
- Click on the green button – finish now
- *If there is a discrepancy – this will need to be investigated and rectified
Sick and tired of reconciling the same payment/receipt in Xero on a weekly/monthly basis?
- When in the bank reconciliation screen, the left-hand side of the screen should show each transaction pulled from the bank.
- Choose a transaction that you wish to add a rule to, click the options drop down box and select “create bank rule.”
- In this screen you can set the parameters for this rule including the contact which it relates to, set the nominal account, set the reference of the transaction and finally, name the rule.
1. Create customised user roles. User roles are a fantastic feature of Xero. …
You can set up specific user roles in Xero, e.g. you can just have one user who can raise Sales invoices to take off the administration tasks but limit them to bank account information.
2. Take shortcuts with the ‘+’ icon. …
The + button at the top on the blue banner will allow you to quickly add in an invoice, Bill, Journal, contact etc.
3. Create a Xero Desktop Shortcut. …
Saves you logging in via the web browser you can simply click on the Xero short cut.
4. Undo a reconciliation error easily. …
Very easy to undo a reconciliation if its not correct – you can do this in the banking screen/account transactions – click on the item, select options and remove and re-do.
This will place the transaction back in the bank reconciliation screen.
5. Use the Inbuilt Calculator. …
This is such a great feature – you can [x,+,- and /] within any value box in Xero.
6. Automate invoice reminders.
Such a time saver! – You can set up automatic invoice reminders that go to your customers, after a number of days that the invoice is overdue. You can also customise the email that is sent to them.
As with all Accounting software the more time and effort you put in to set up the system the better reporting information you will obtain.
- Go to Customer
- New customer
- On the set up after the Name and contact
- There is a box ‘Sub customer’
If you are entering purchase invoices on Quickbooks and want to make sure you don’t enter a duplicated invoice you can swich on an option in settings that will notify you if a duplicate invoice number is used for a supplier.
- Click on the Cog in the top right corner
- Click on Accounts and Settings
- Click on Advanced
- Under other preferences
- Click edit [small pencil on the right hand side]
- Change option to ‘Warn me when I enter a bill number that’s already been used for that supplier’
- Save
- Close
Do you often invoice your customers for the same product or service and spend ages meticulously entering the details about those items every time you create a new invoice? You may be able to save some valuable time by creating a price list instead. Once your price list is set up, when it’s time to invoice your customer you simply choose the item you need from the list, and FreeAgent will automatically add the item to your invoice.
To find out more click here.
2022
QuickBooks Online Lets you upload and save attachments on any transaction.
This makes referencing source documents easier and more efficient.
To add an attachment:
1. Open an invoice
2. Click attachments icon
3. Browse for the attachment
4. Click Save
NOTE: Now QuickBooks Online lets you view the source document when viewing the transaction. This is helpful for receipts, bank statements, copies of transactions, etc.
As a daily user of Xero by far for me the best time saving option is to open multiple Pages at the same time
- To open a link in a new tab on a PC, right-click on a link and select Open a new Tab.
- To open a link in a new tab on a Mac, hold down the Command key and click on the link.
As a small business owner, you probably rely on a range of digital tools to help you get things done. FreeAgent has combined forces with lots of market-leading integration partners, from e-commerce and payment solutions to forecasting and productivity tools. In FreeAgent, navigate to ‘Connections’ from the drop-down menu that displays your company name to see the full list of integrations available and to get the setup process started.
Did you know there is a helpful list of shortcuts in QuickBooks Online?
It can be accessed by pressing the following keys at the same time: CTRL + ALT + ?
Additional information
You’re viewing QuickBooks in Accountant view
Your Company ID is 4620 8163 6524 XXXX XXX Copy
Keyboard Shortcuts
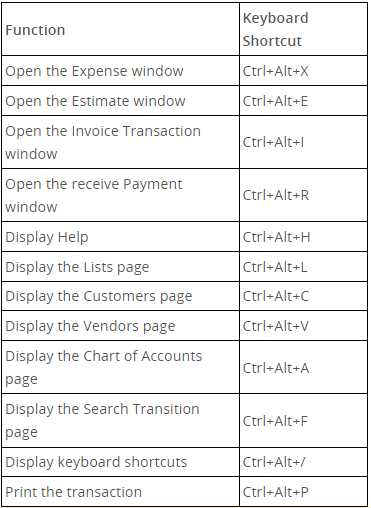
To use a shortcut, press and hold ctrl/control and alt/option at the same time. Then press one of the keys below.
When you press this shortcut, QuickBooks Online displays the list of shortcuts.
In addition to these shortcuts, you can access date shortcuts on transactions.
To use the date shortcuts, place your cursor in any date field in QuickBooks online and use the following shortcut keys:
- T – enters today’s date
- W – enter the first day in the week
- K – enters the last day in the week
- Y – enters the first day in the year
- R – enters the last day in the year
- M – enters the first day in the month
- H – enters the last day in the month
A great tip to save time in xero is to create recurring invoices and bills
You can create a recurring Sales Invoice and recurring Purchase Bills
This is extremely useful if you have a customer that you invoice the same amount each month.
You can create the invoice and Xero can approve and send out to the customer automatically.
Or
You can create and save for you to update, add attachments, review then you can send and approve.
You can do the same for Purchase Bills.
I find this especially useful if you pay an invoice by DD each month – for example an insurance premium.
You can create a recurring bill each month and this amount will match to the DD that has been paid from your bank.
For more information on recurring bills and invoices please do contact me on annarowson-smith@ellis-uk.com or 01244 343504
Or visit:
Quickbooks online allows you to upload and save attachments to any transaction. Whether is a bank/credit card transaction or a posted journal.
This allows you to have an audit trail of your postings and if there are any queries allows your accountant to look for the attachment.
We advise that if you are VAT registered you attach all VAT receipts to your bank and credit card transactions
To add a transactions:-
- Open the transaction line from the bank/credit card
- Click on the attachment icon at the bottom left corner
- Browse the attachment
- Upload
- Click and save
You may have already visited the Knowlegde Base to find answers to your questions or to troubleshoot, but have you met Ruby the Robot?
You can find Ruby when you’re logged into FreeAgent by clicking on the blue ‘Help’ button in the bottom right-hand corner of the screen. From there, Ruby will pop up and offer her services to help answer questions and to search the Knowlegde Base for you.
I use Xero every day and for me by far, the best time saving feature is having more than one session open at time.
This is especially helpful if you have more than one screen set up – However it is quite accessible with only one screen as you can [ALT & ←] to skip between screens.
With two sessions open at a time – You can have the bank reconciliation screen open and the files option open.
This will enable you to load and enter the invoices and receipts and check and match the payments that have come out of your bank with a quick ‘click’.
Keyboard shortcuts can help you save time and allow you to keep your hands on the keyboard when you enter information into QuickBooks Online. Use these keyboards shortcuts when working in a transaction window. Mac users can substitute Option for Alt in the following table.
There’s also an easy way to access these common commands with a shortcut of its own. By hitting CTRL + ALT + ? for PC or CTRL + OPTION + MAC, a menu will pop up with these shortcuts, which are summarised below.
Insights is an innovative feature that uses your data in FreeAgent to highlight certain aspects of your business’ performance – as well as opportunites and potential issues – so that you make better informed decisions about your business and finances. At the moment there are four insights available:
- Top customers – Insights highlights your top five customers from the last six months.
- Upcoming VAT payment – this lets you know when you have an upcoming VAT payment to budget for.
- Slowest-paying customers – this shows you your slowest-paying customers from the past 12 months and offers guidance to help you get paid faster.
- Top spending catergories – this highlights your top five spending catergories from the last six months to give you a clearer picture of your outgoings.
Keen to check out your most recent insights? Navigate to the bell-shaped icon at the top right of your screen in FreeAgent and dive straight in!
- Click on Accounting on the left hand side
- Click on reconcile
- Choose your account to reconcile
- Add in the date and the balance of your actual bank at the date you have entered
- The difference should be 0.00*
- Click on the green button – finish now
- *If there is a discrepancy – this will need to be investigated and rectified


